Paper Writing
1、免费下载SCI文献的方法
2、硕士论文的书写方法
3、Obsidian与Zotero联动高效阅读文献
4、PicGo图床配置
5、文档写作技巧
6、代码规范
-
+
游客
注册
登录
PicGo图床配置
## 背景 [PicGo是一个用于快速上传图片并获取图片 URL 链接的工具](https://picgo.github.io/PicGo-Doc/zh/guide)。支持多种图床,包括[腾讯云COS](https://cloud.tencent.com/product/cos)、[阿里云OSS](https://www.aliyun.com/product/oss)、[SM.MS](https://sm.ms)、[Github](https://github.com)、[七牛云](https://www.qiniu.com)、[Imgur](https://imgur.com)、[又拍云](https://www.upyun.com)等。同时可以借用第三方插件自定义 Web 图床。支持拖拽图片上传,拥有丰富的[插件系统](https://github.com/PicGo/Awesome-PicGo),可以为图片管理带来一种全新的体验。 ## 下载安装 - [GitHub Release](https://github.com/Molunerfinn/PicGo/releases) ## 图床配置 ### 自定义 Web 图床 - [下载](https://nodejs.org/en)并安装 NodeJS; - 安装 web-uploader 插件。 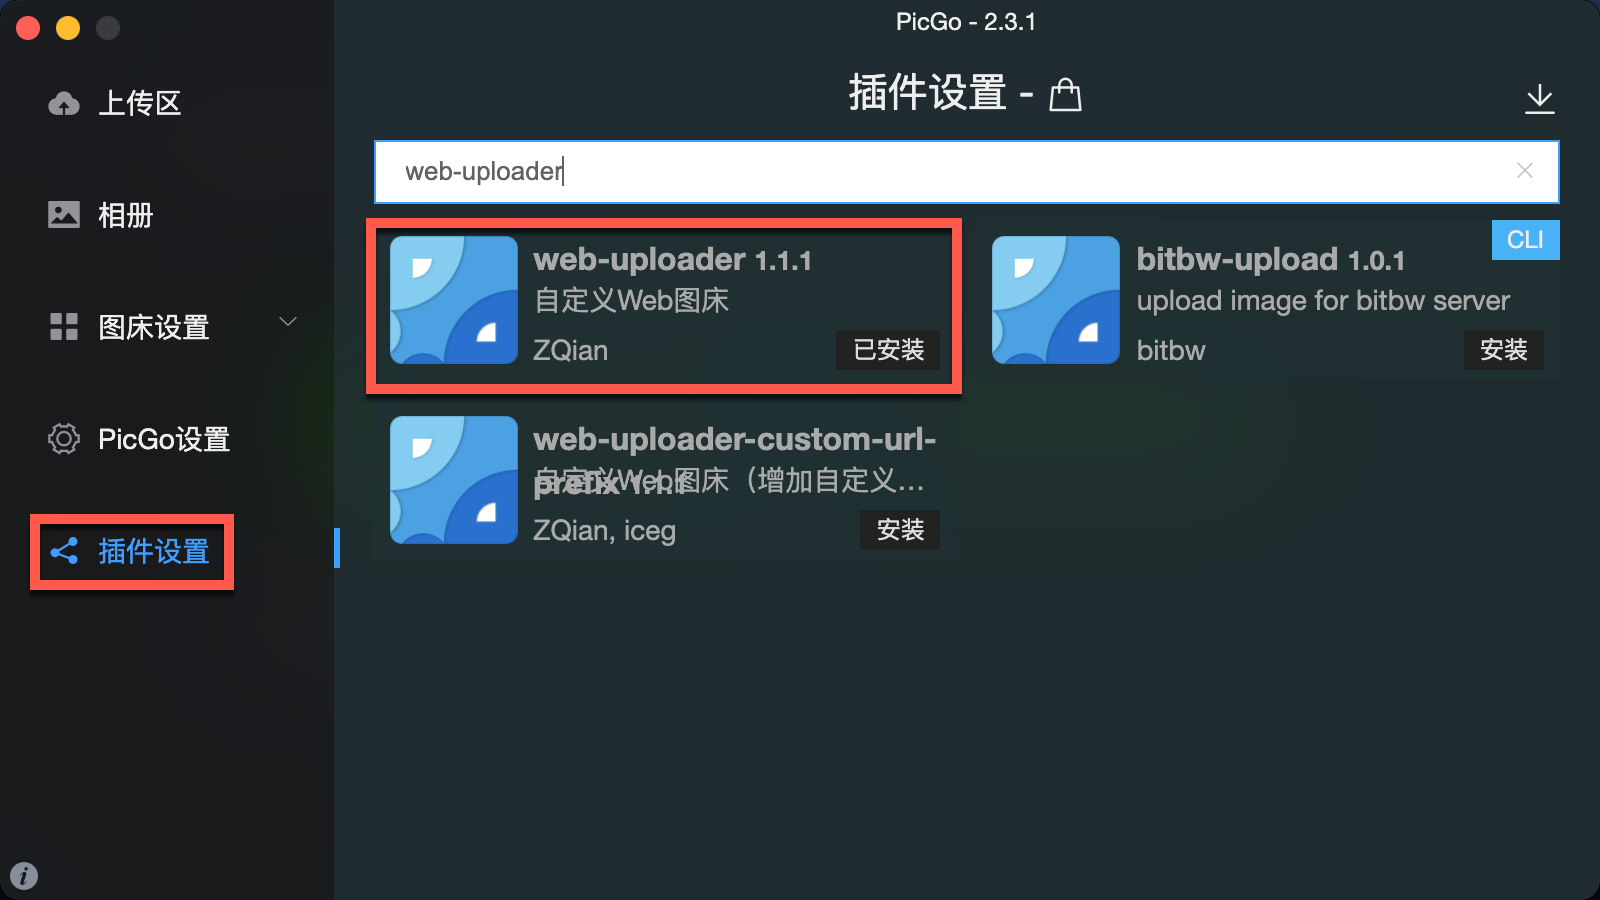 - 配置插件: - 依次点击【图床设置 -> 自定义 Web 图床】 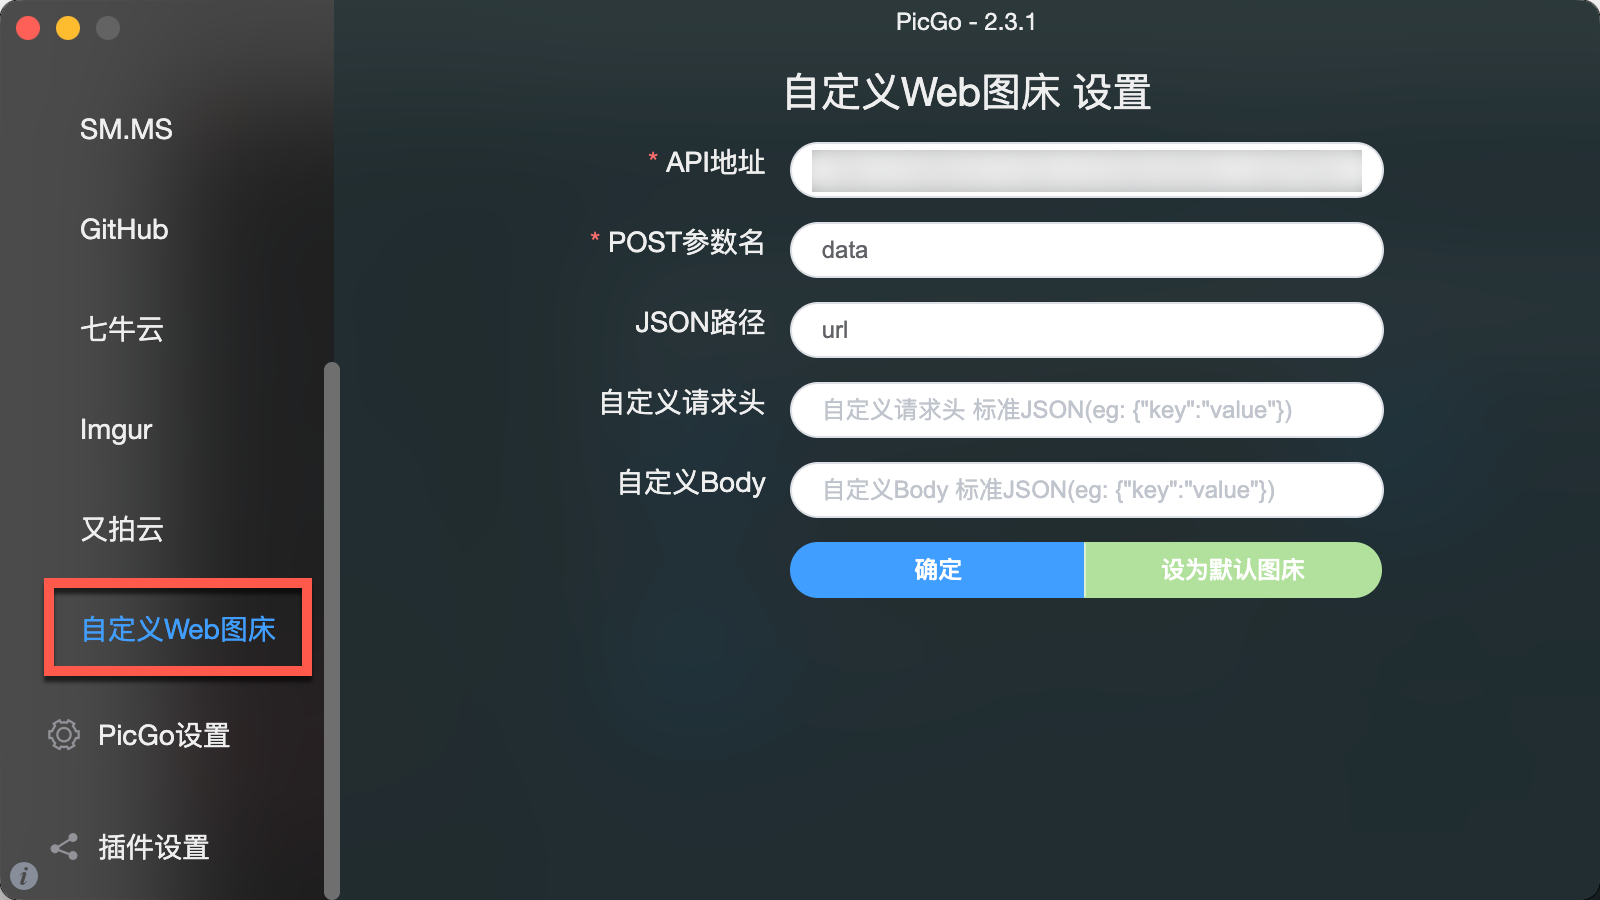 - 参数设置: - **API 地址**:上传图片解析地址,记住**地址的结尾要加一个`/`**,如果不加的话会被 301 重定向,`POST`请求可能会被转换为`GET`请求,导致服务器获取不到相关参数。 - **POST参数名**:POST 请求中参数的名称。 - **JSON路径**:服务器返回数据中图片的 URL 地址。 - **自定义请求头**:自定义的请求头,JSON格式。 - **自定义Body**:自定义的 Body,JSON格式。 - 参数设置完成后将其**设置为默认图床**。 - 修改配置文件: - 文件路径:`/Users/user/Library/Application Support/picgo/node_modules/picgo-plugin-web-uploader/src/index.js` - 修改后的文件主要有两个功能,分别是**将图片转换为 BASE64 格式**、将转换后的图片**通过 POST 请求上传到服务器**。 ~~~js // const logger = require('@varnxy/logger') // logger.setDirectory('/Users/zhang/Work/WorkSpaces/WebWorkSpace/picgo-plugin-web-uploader/logs') // let log = logger('plugin') module.exports = (ctx) => { const register = () => { ctx.helper.uploader.register('web-uploader', { handle, name: '自定义Web图床', config: config }) } const handle = async function (ctx) { let userConfig = ctx.getConfig('picBed.web-uploader') if (!userConfig) { throw new Error('Can\'t find uploader config') } const url = userConfig.url const paramName = userConfig.paramName const jsonPath = userConfig.jsonPath const customHeader = userConfig.customHeader const customBody = userConfig.customBody try { let imgList = ctx.output for (let i in imgList) { let base64 = imgList[i].buffer.toString('base64') let image = imgList[i].base64Image if (!image && imgList[i].buffer) { image = imgList[i].buffer.toString('base64') } let body = await ((ext,base64,options)=>{ const image_base64 = "data://image/"+ext.substr(1)+";base64,"+base64 const postConfig = options(image_base64, url) return ctx.Request.request(postConfig) })(imgList[i].extname,image,postOptions) delete imgList[i].base64Image delete imgList[i].buffer if (!jsonPath) { imgList[i]['imgUrl'] = body } else { body = JSON.parse(body) let imgUrl = body for (let field of jsonPath.split('.')) { imgUrl = imgUrl[field] } if (imgUrl) { imgList[i]['imgUrl'] = imgUrl } else { ctx.emit('notification', { title: '返回解析失败', body: '请检查JsonPath设置' }) } } } } catch (err) { ctx.emit('notification', { title: '上传失败', body: JSON.stringify(err) }) } } const postOptions = (image, url) => { const opts = { method: 'POST', url: url, headers: {contentType: 'multipart/form-data;'}, formData: { data: image } } return opts } const config = ctx => { let userConfig = ctx.getConfig('picBed.web-uploader') if (!userConfig) { userConfig = {} } return [ { name: 'url', type: 'input', default: userConfig.url, required: true, message: 'API地址', alias: 'API地址' }, { name: 'paramName', type: 'input', default: userConfig.paramName, required: true, message: 'POST参数名', alias: 'POST参数名' }, { name: 'jsonPath', type: 'input', default: userConfig.jsonPath, required: false, message: '图片URL JSON路径(eg: data.url)', alias: 'JSON路径' }, { name: 'customHeader', type: 'input', default: userConfig.customHeader, required: false, message: '自定义请求头 标准JSON(eg: {"key":"value"})', alias: '自定义请求头' }, { name: 'customBody', type: 'input', default: userConfig.customBody, required: false, message: '自定义Body 标准JSON(eg: {"key":"value"})', alias: '自定义Body' } ] } return { uploader: 'web-uploader', // transformer: 'web-uploader', // config: config, register } } ~~~ - 修改完成后便可以通过 PicGo 将图片上传到服务器,并获得服务器返回的图片地址。 ## 配合使用 ### Obsidian - 在插件市场搜索并安装 `Image auto upload Plugin`。 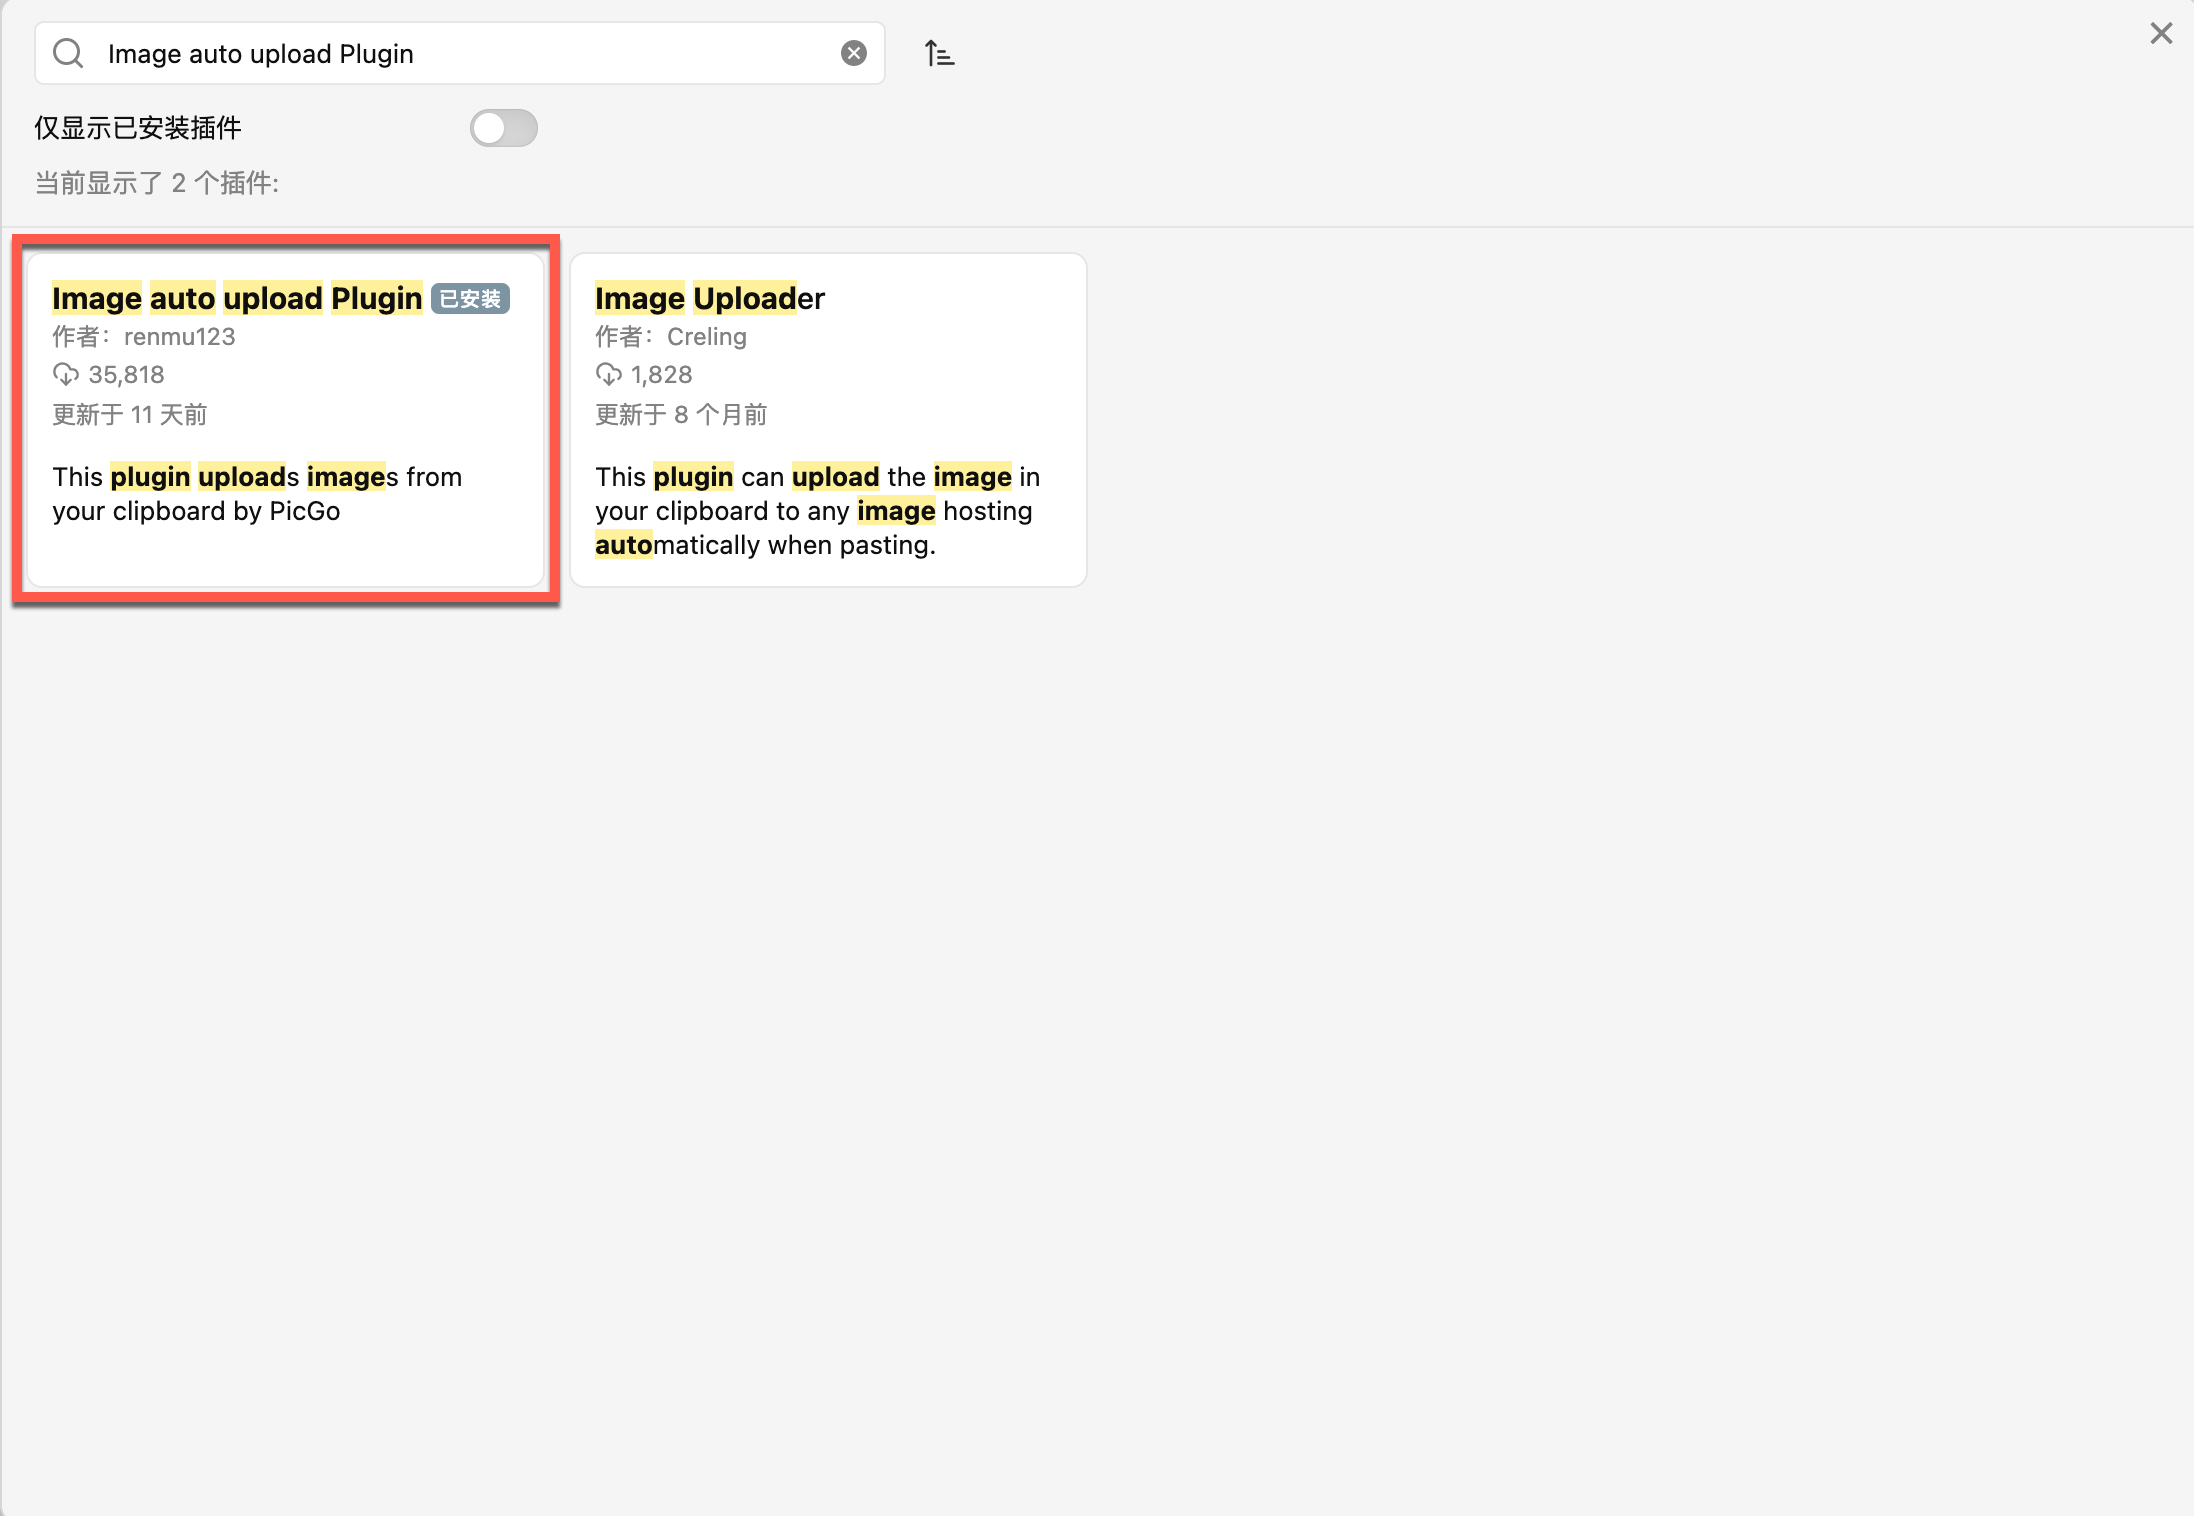 - 配置插件(默认上传器选择 PicGo(app),其他默认即可)。 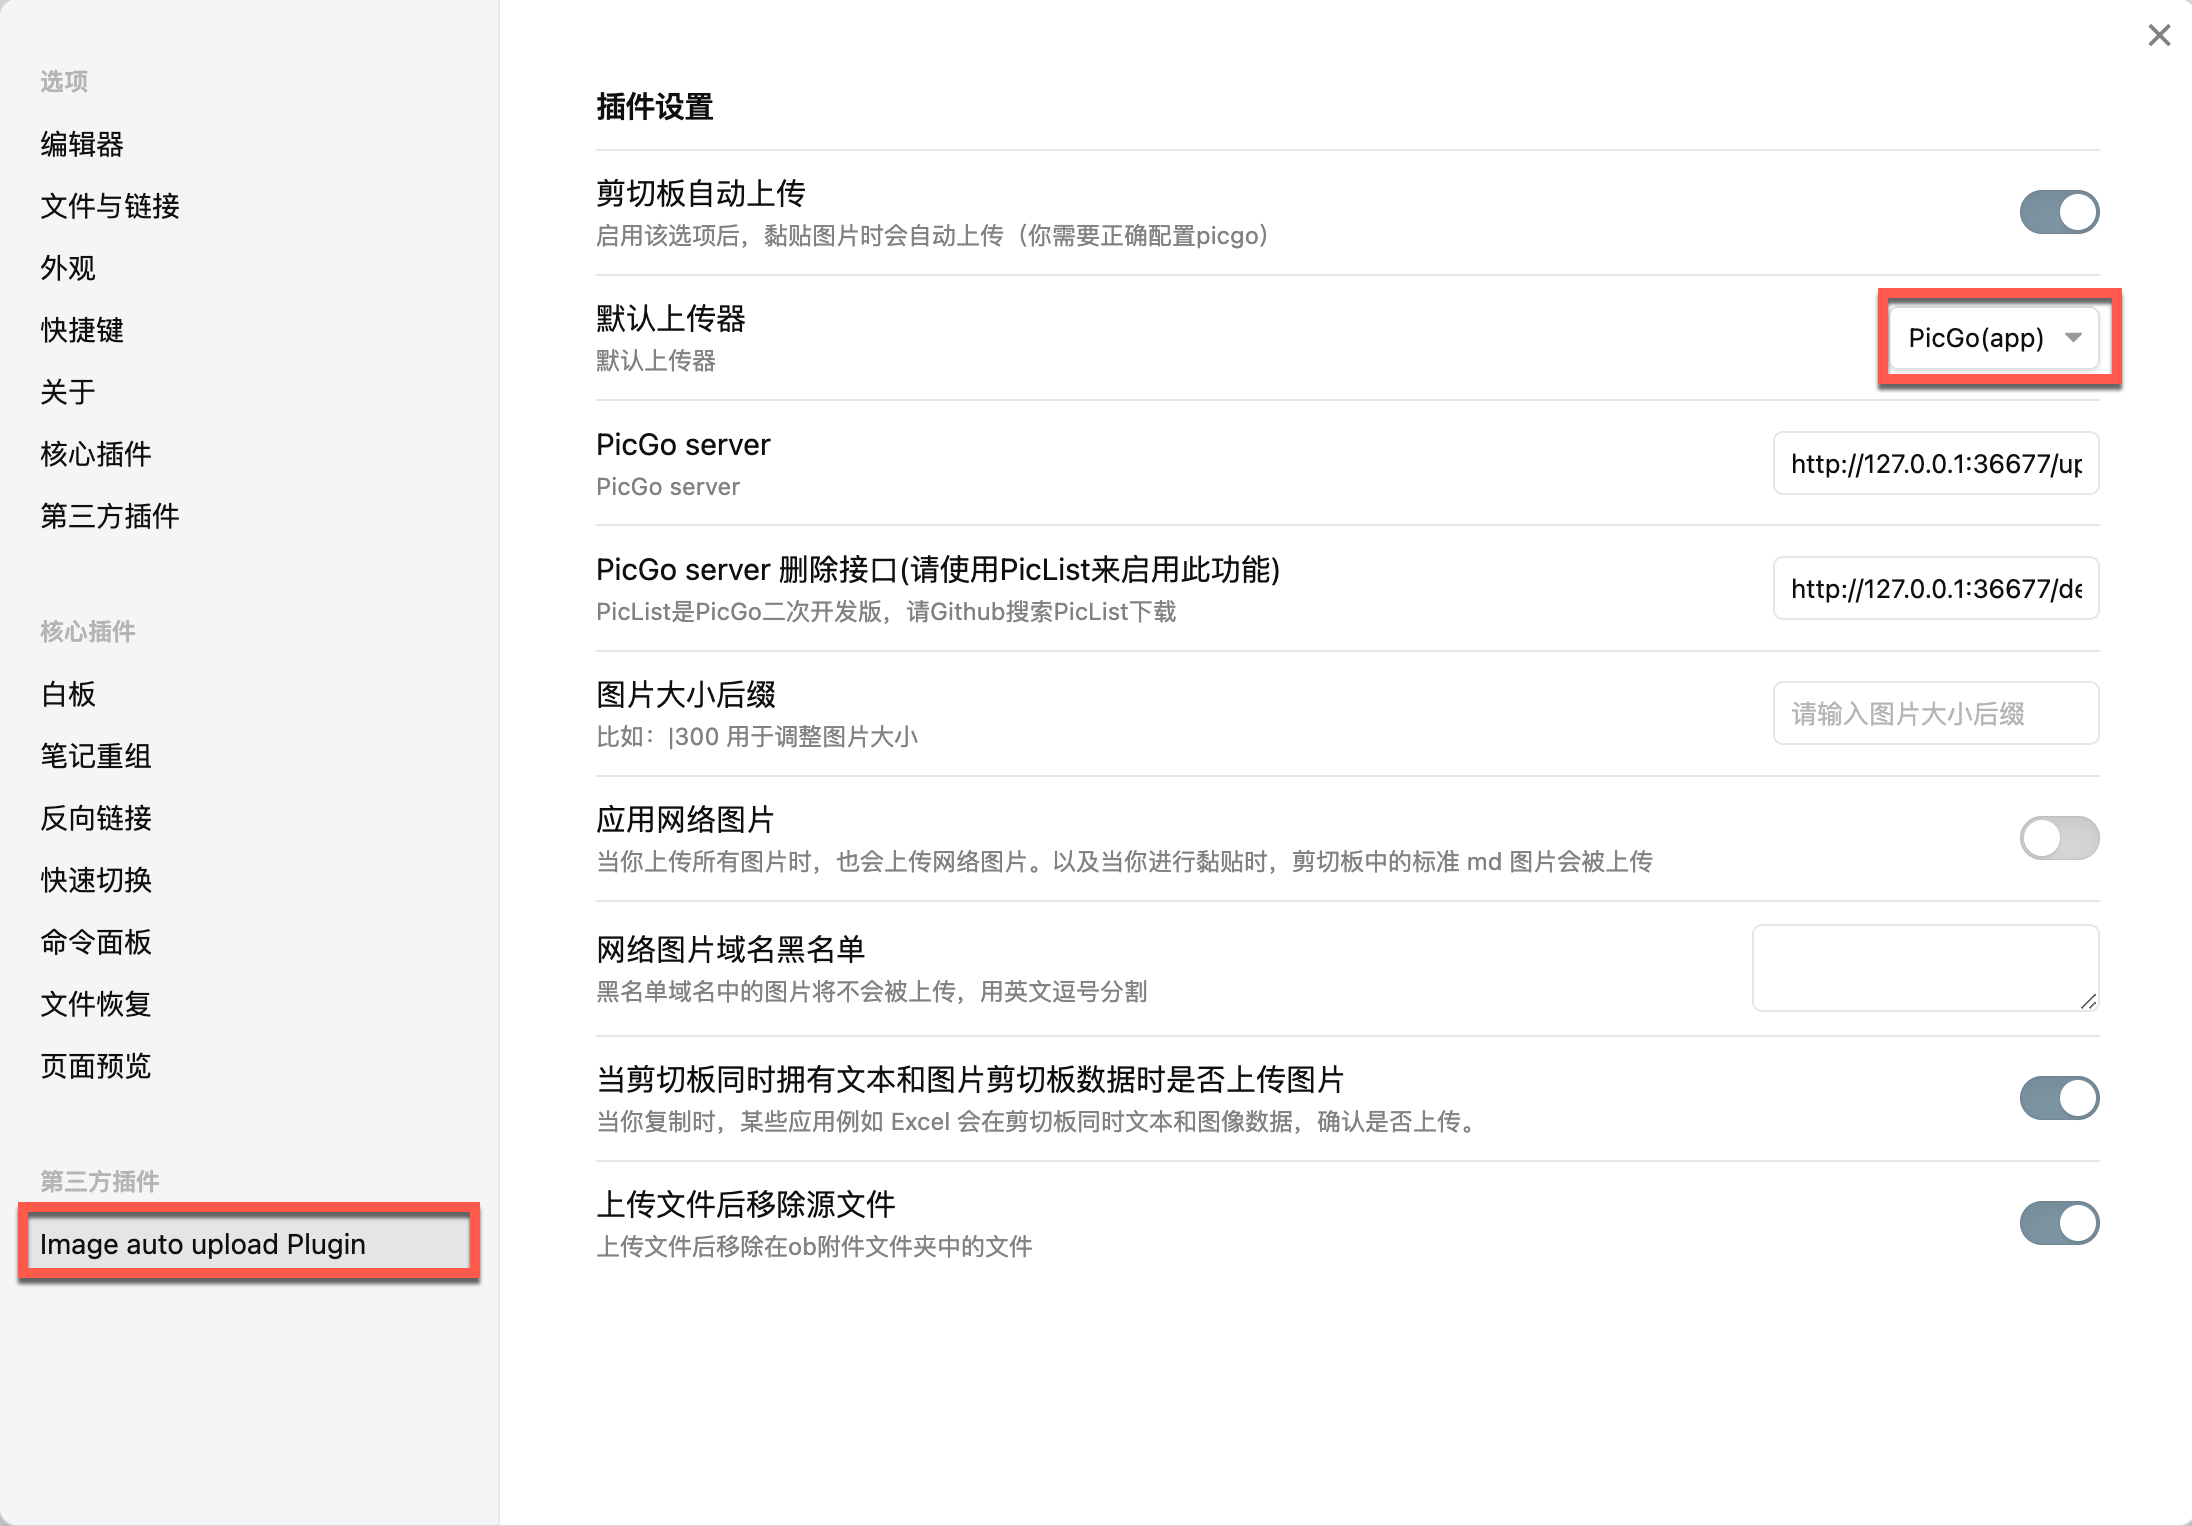 - 配置完成后在 Obsidian 编辑器里面直接粘贴图片便可以自动上传到服务器并显示服务器返回的地址。 ### Typora - 依次选择【设置 -> 图像】,在【上传服务设定】中将上传服务修改为`PicGo.app`。 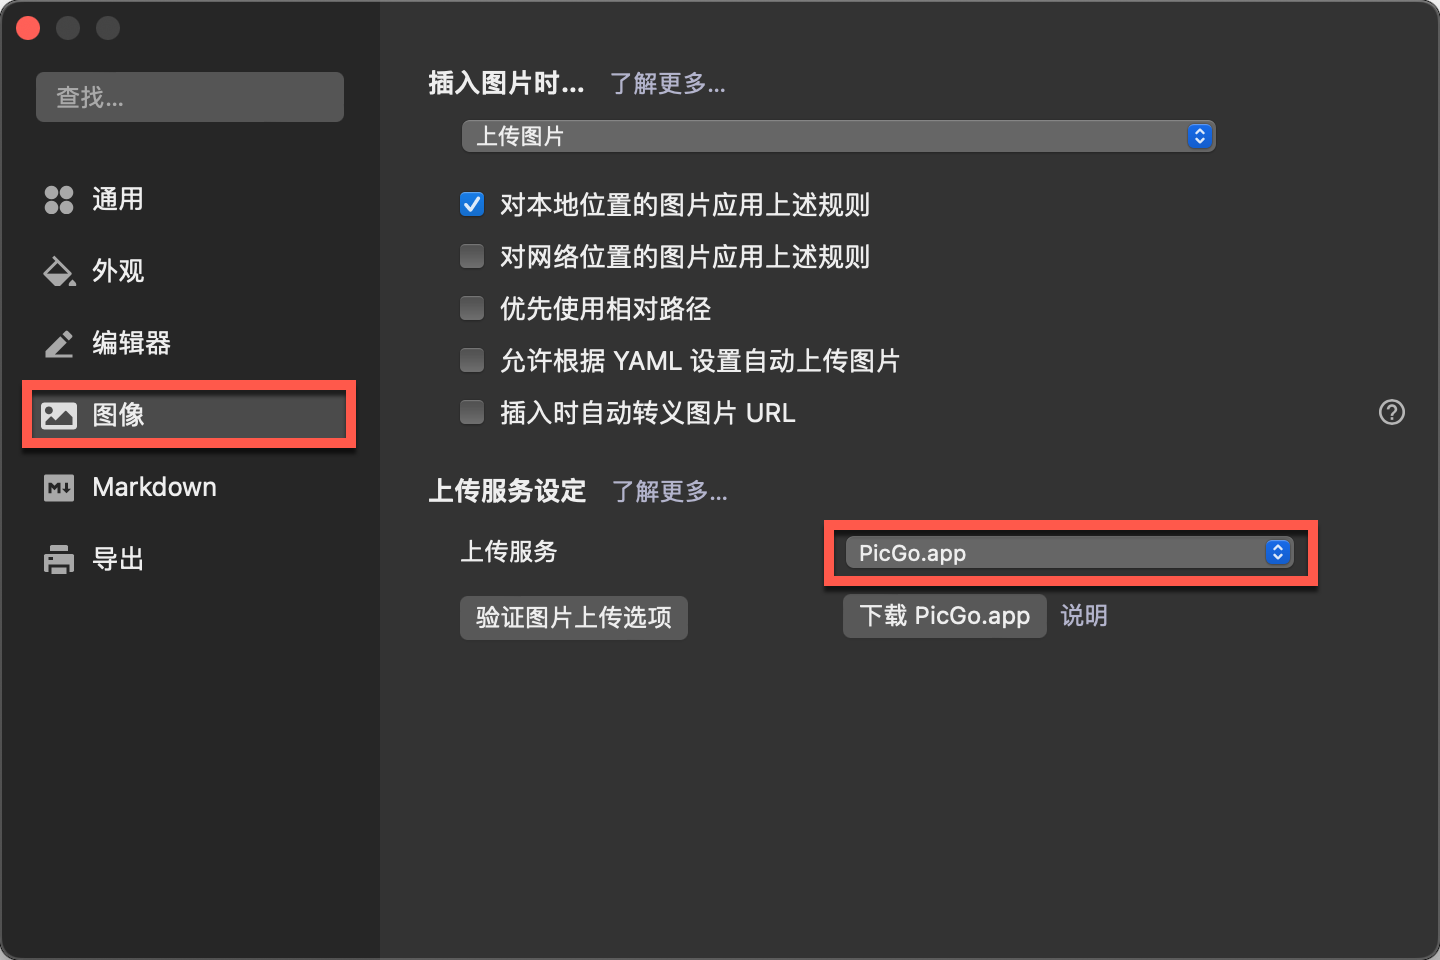 - 配置完成后在 Typora 编辑器里面直接粘贴图片便可以自动上传到服务器并显示服务器返回的地址。 ## 总结 PicGo 作为一个优秀的图床管理工具,可以为图片的管理带来一种全新的体验。通过将 PicGo 与 [Obsidian](https://obsidian.md)、[Typora](https://typora.io)等结合,可以为我们的博客书写和知识管理带来莫大的帮助。 关于 PicGo 的其他内容,可以阅读 [PicGo is Here](https://picgo.github.io/PicGo-Doc/zh/guide/#picgo-is-here)。
ricear
2023年4月19日 09:42
©
BY-NC-ND(4.0)
转发文档
收藏文档
上一篇
下一篇
手机扫码
复制链接
手机扫一扫转发分享
复制链接
Markdown文件
分享
链接
类型
密码
更新密码